|
Marker
Light Rebuild
|
|
|
The
original K D marker lights on the trailer were in bad shape. I could have
opted to replace them with a new tear drop style marker but nothing out
there compares with the quality of these old lights. The replacements
that you find today have plastic lenses and the styling doesn't quite
line up to the original. The interior components on the originals have
rusted out and are non functioning. A new base will be made from .33 inch
thick plexi to replace the rusted old pressed metal originals. My plan
is to make a template out of wood then use a router to cut the new plexi
bases then mount a new mini bayonet socket to hold a 1815 mini bayonet
bulb, 13 volts 4.29 watts .33 amps. On the back side of the new base a
gasket will be installed for a water tight seal against the fixture and
the trailer.
|
|
|
| I have revised the
method for cutting the plexi. Instead of using a router I have opted to
use a jewelers saw and a template made of heavy paper. Another option is
to use aluminum sheeting instead of plexi. The jewelers saw would work well
with this material as well. The first base has been made and works well.
The jewelers saw allows for tighter radiuses and cuts through the material
easily. I will post photos soon. I have ordered the replacement sockets
and bulbs. 20 bulbs, 10 sockets - $17 and change. |
|
|
|
|
|
This
is a drawing of the base that is being made.
|
|
|
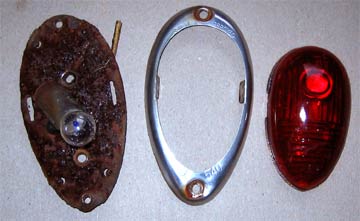
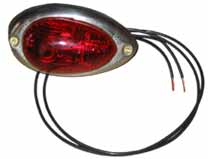
| This shows the components
which make up the original lights. In order to remove the lights you either
have to grind off the bolt heads which fastens it to the trailer or gain
access from inside the trailer to loosen the nuts which attach to the bolts.
|
|
|
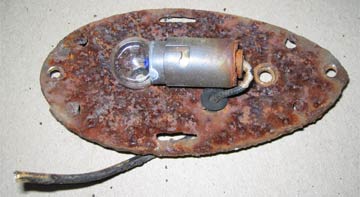
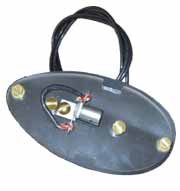
| This is the problem.
The press metal base has rusted and the socket has shorted. |
|
|
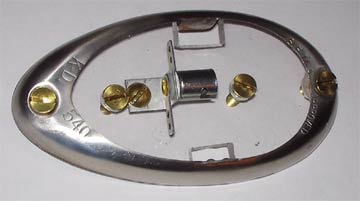
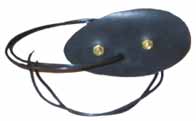
| This is the prototype
base. The side clamp cutouts were made smaller in the final run. The bolts
toward the center fasten the base to the trailer. A rubber gasket will fit
between the base and the trailer skin. The metal rim is held in place by
two bolts with nuts recessed into the plexi so that the back side will fit
flush against the trailer. This was done using a router bit in a drill press.
|